How to Plan Printed Hoarding Panels for a Building Site
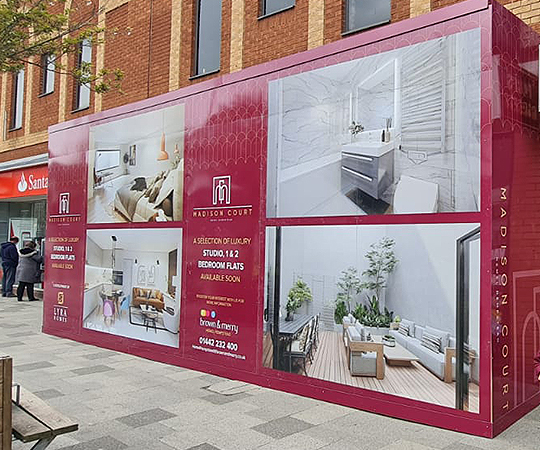
Printed panels can turn a plain boundary into something that genuinely represents a project, but the results depend heavily on preparation. Without a plan, it is easy to end up with mismatched sizes, artwork that ignores the joints, or a delivery that arrives before the frame is ready. With one, the whole process runs smoothly and the finished frontage looks intentional rather than improvised. The step-by-step approach below follows the order most project managers use, starting with the brief and finishing with installation and aftercare.
Step 1: Set the Brief
Decide what the panels must achieve. Is the priority security, marketing, community engagement or simply a tidy appearance? Write down the project duration, the budget and who signs off the artwork. A one-page brief saves endless back-and-forth later on.
Step 2: Measure and Map the Run
Take accurate measurements of every elevation, including gates, corners and changes in level. Mark which sections face the public and which are hidden. On most construction site hoarding, only the street-facing runs justify full-colour print, while rear boundaries can stay plain.
Then draw a simple elevation for each run, showing every panel as a numbered rectangle. This becomes the master reference for designers, printers and installers alike.
Step 3: Choose the Substrate
Long programmes and prestige sites
An aluminium composite panel is the go-to option for schemes lasting a year or more. Its rigid core keeps the face perfectly flat, so large images look crisp and the joins stay neat.
Shorter or budget-led jobs
Foamex and printed plywood cost less and still look smart for a few months. Correx works for very short projects, though it marks easily.
Before you commit, it helps to step back and look at the wider picture. There is a helpful article on Temporary Construction Hoarding: What Should Contractors Consider?, which covers the site-side questions that sit alongside the print.
Step 4: Design Around the Grid
Artwork should respect the panel layout. Keep faces, logos and headline text away from the joints, and allow bleed on every edge. Supply files at full size or to a stated scale, in CMYK, with images at a resolution suited to the viewing distance. If you are unsure, ask for a free artwork check before anything goes to print.
Step 5: Coordinate Delivery and Installation
Schedule delivery to match the frame installation, not before it, as stored panels are easily scratched. Confirm the fixing method too: an aluminium composite panel can be riveted, screwed or mounted on a rail, and each option needs different preparation from the printer.
These typical lead times help when building the programme:
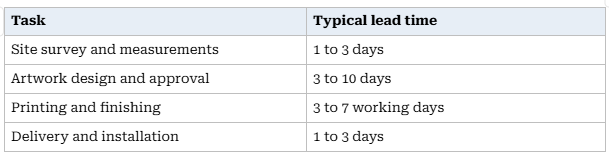
Busy periods and bespoke finishes can stretch these, so leave a little slack.
Step 6: Look After It
Assign someone to inspect the run each week. Clean panels with a soft cloth and mild detergent, report damage quickly and keep a record of panel numbers so replacements can be ordered precisely. Consider an anti-graffiti film on vulnerable sections, and keep a small stock of spare printed panels on site.
A well-kept construction site hoarding reflects well on everyone involved, from the developer to the trades working behind it.
Final Thoughts
Good planning is rarely glamorous, but it is what separates a polished frontage from a patchwork of compromises. Set a clear brief, map the run, choose the right substrate, design around the layout, coordinate installation and keep on top of maintenance. Each step is simple on its own, and together they deliver a result that serves the project from groundworks to handover. If you would like support at any stage, the team at Hoarding Print Company can review your plans, check artwork and recommend a specification that suits both the site and the budget.

Comments
Post a Comment